Wednesday, June 6, 2012
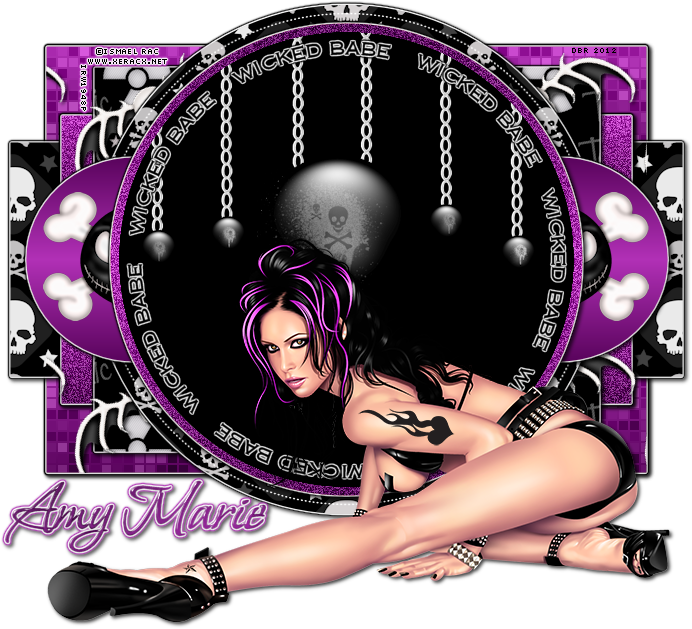
PTU - Wicked Babe
ADVANCED TUTORIAL
This tutorial was made using PSPX2, but can be adapted
To do this tutorial you must have working knowledge of Paint Shop Pro
This tutorial was written by DesignsbyRená on June 6, 2012
Any resemblance is purely coincidental. Enjoy!
I am using the wonderful work of Ismael Rac, which I purchased here!
Items you need:
Template by Rosey 72 which can be found here!
Scrapkit “Back in Black” by AmyMarie, which you can purchase here!
Plugins Needed
Eye Candy 4000
MuRa’s Meister – Copies 1.3
Xero>Fritillary
Font is Bonheur Royale (came with my computer)
Image>canvas size> 800x800 (we can crop layer)
Delete the credits layer & white background layer
Also delete the flames and stars layers
Pick 2 colors from your tube (I used #b130b6 as foreground and #59035c as background)
Now we are ready to start tagging!
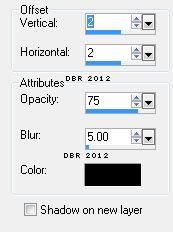
LITTLE NOTE: You have the option to add a drop shadow (below) to each lever
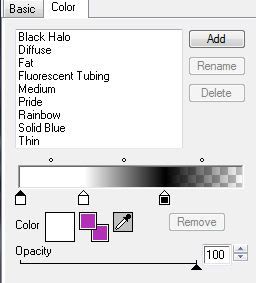
You also have the option of adding a gradient glow to each main layer
Select layer Lrg Pink Rectangle
Float/defloat
Flood fill with gradient
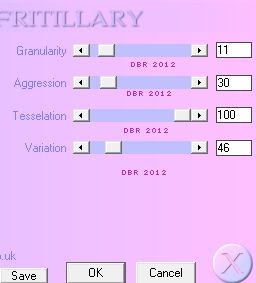
Xero>Fritillary
Apply gradient glow, then drop shadow
Delete the original layer
Select black rectangle
Float/defloat
Open paper 013 of the scrap kit
Paste as a new layer
Invert>delete the excess>deselect
Apply gradient glow, then drop shadow
Select layer pink rectangle
Floodfill with your gradient
Apply gradient glow, then drop shadow
Select layer left white
Float/defloat
Open paper 014 from the kit
Copy>paste as a new layer
Invert>delete the excess>deselect
Apply gradient glow, then drop shadow
Do the same for layer right white
Select layer Black Circle
Float/defloat
Open paper 012
Copy>paste as a new layer
Invert selection>delete the excess
Add a new layer
Open element wsk1
Copy>paste as a new layer
Image>Resize by 50%
Adjust>sharpen>sharpen
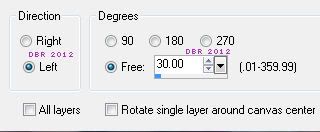
Image>free rotate>30% to the left
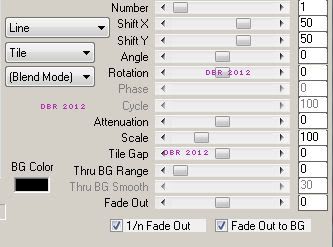
Then using MuRa’s Meister’s copies, use the following settings
Now back on the black circle layer
Float>defloat
Invert selection
Select the wsk1 layer>delete the excess
Select the pinkcircles layer
Float>defloat
Add a new layer
Floodfill with gradient
Delete the original layer
Add gradient glow & drop shadow again (if you would like)
Open element jsk1 from the scrapkit
Copy>paste as a new layer
Image>resize by 60%
Layers>arrange>move to top
(this is just so you can see it better)
Move to the center of the left circle
Deselect
Image>mirror
Now merge the 2 skulls layers (jsk1)
Move on top of your pinkcircles layer (whatever gradient you used for this)
Select the Glitter Circle layer
Float>defloat
Add a new layer
Floodfill with gradient
Adjust>add/remove noise>add noise>uniform> 50%
Add gradient glow & drop shadow
Delete original layer
Select the white circle layer
Float/defloat
Add a new layer
Floodfill with black (#000000)
While still selected, open element AM_Chain2012
Copy & paste as a new layer
Arrange to meet your needs
Invert selection>delete the excess of the chain
Select the wordart layer
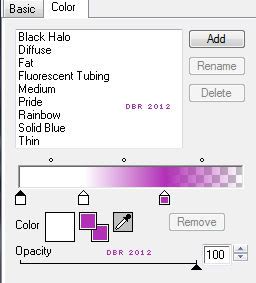
Add the following gradient glow
Now add your tube!
For my font, I used Bonheur Royale with the following gradient glow
Don’t forget to crop your tag
DON’T FORGET TO ADD PROPER © INFORMATION!!!!!
I also added the black/white gradient glow to my © information
Anywayz, I hope you have enjoyed this tutorial.
If you have any questions, suggestions, or want to show off your results, please email me at
Labels:
Ismael Rac,
PTU
Subscribe to:
Post Comments (Atom)
About Me

- Designs by Rená
- SAHM to two wonderful children. Married for 14 years to my best friend. I have been using PSP for 15+ years now,and love all aspects of it. If you need to get ahold of me,please email me at designsbyrena01@windstream.net
Labels
- PTU (25)
- Ismael Rac (9)
- VeryMany (9)
- Rebellious Scraps (3)
- FTU (2)
- Anna Marine (1)
- Bettie Page (1)
- Carlos Diez (1)
- Keith Garvey (1)
- Nolan Worthington (1)
- Scott Blair (1)




0 comments:
Post a Comment