Monday, June 18, 2012
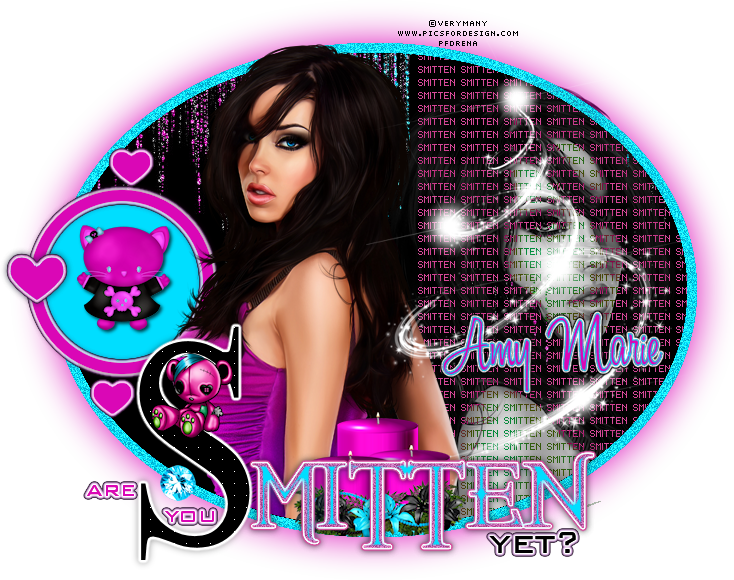
PTU - Smitten
This tutorial was made using PSPX2, but can be adapted
To do this tutorial you must have working knowledge of Paint Shop Pro
This tutorial was written by DesignsbyRená on June 18th, 2012
Any resemblance is purely coincidental. Enjoy!
I am using the wonderful work of VeryMany, which can be purchased at www.picsfordesign.com
Items you need:
Scrapkit “Emo Glamure” by AmyMarie, which you can purchase here!
Template by Missy 280 which can be found here!
You will need a tube & a close-up for this tag
Plugins Needed
Eye Candy 4000
Font is A&S Black Swan
Image>canvas size> 800x800 (we can crop layer)
Delete the credits layer & white background layer
Select the “blur” layer
Float/defloat
Add a new layer and flood fill with #da07b6
Hide the original “blur” layer
Now select the “oval” layer
Float/defloat
Flood fill with #00deff
Image>add noise 50%
Selections>contract>10
Add a new layer
Floodfill with #000000 (black)
Open element “glitterstrings”
Copy & paste as a new layer
Using your free selection tool
Select the “glitterstrings” that overlap the “smitten words” wordart
And then delete it!
This should u with a layer of “glitterstrings” that are not under the “smitten words” layer
Next, select the “circle” layer
Add a new layer, and floodfill with #00deff
Now open element “kittyemo”
Resize to your liking
Place inside your “circle” layer
Add your favorite dropshadow
Select the “frame” layer
Float/defloat
Contract the selection to your satisfaction & floodfill with #da07b6
Add your favorite gradient glow
Next, open your closeup
Copy & paste as a new layer (if necessary, mirror it to be opposite of your full tube)
Resize to your liking and then adjust>sharpen
Place to the right (this will move it under the “smitten” layer)
Change the layer to “difference”
Next open your main tube & place to the right
On both tube layers, I inverted the selection on the black circle layer that I made, and erased the excess on the bottom, so the top is overlapping the noisy frame we made.
Now open element “4s”
Add as a new layer, and place where you desire. I chose to place it over my closeup
Next, open element “candles4”
Copy & paste as a new layer
Resize & place to your liking. I placed mine in the bottom of the oval layer, and deleted the excess
Open element “bear1”
Copy & paste as a new layer
Resize to your liking and place on the “S” Layer (look to my tag for an example)
Now select the “hearts” layer
Float/defloat
Flood fill the hearts with #da07b6
Add your favorite gradient glow
Add the original “hearts” layer
Select the “words” layer
Flood fill the “are you” with your #da07b6 color
Add your favorite gradient glow
Now select the “smitten wordart”
Float/defloat
Add a new layer
Selections>contract to your liking and floodfill with #00deff
Adjust>add noise 50%
Open element “1g” & place to your liking (you will need to resize & sharpen)
Crop your tag!
Add your name!
I used #00deffmy foreground & #da07b6 as my background
Place to your liking
Add your favorite gradient glow
For my font, I used A&S black swan at size 72, this is a pay font, so unfortunately, I cannot share :o(
DON’T FORGET TO ADD PROPER © INFORMATION!!!!!
Anywayz, I hope you have enjoyed this tutorial.
If you have any questions, suggestions, or want to show off your results, please email me at
Subscribe to:
Post Comments (Atom)
About Me

- Designs by Rená
- SAHM to two wonderful children. Married for 14 years to my best friend. I have been using PSP for 15+ years now,and love all aspects of it. If you need to get ahold of me,please email me at designsbyrena01@windstream.net
Labels
- PTU (25)
- Ismael Rac (9)
- VeryMany (9)
- Rebellious Scraps (3)
- FTU (2)
- Anna Marine (1)
- Bettie Page (1)
- Carlos Diez (1)
- Keith Garvey (1)
- Nolan Worthington (1)
- Scott Blair (1)


0 comments:
Post a Comment