Sunday, June 17, 2012
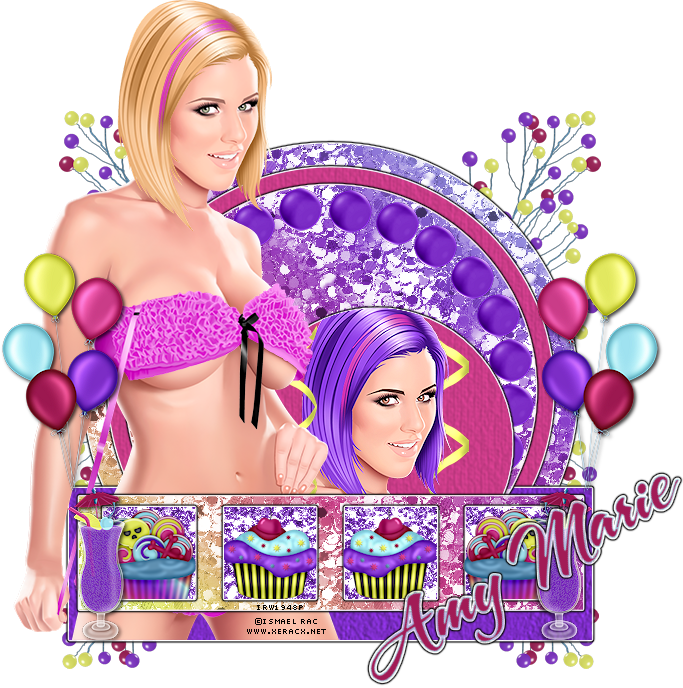
PTU - Summer Treat
This tutorial was made using PSPX2, but can be adapted
To do this tutorial you must have working knowledge of Paint Shop Pro
This tutorial was written by DesignsbyRená on June 17th, 2012
Any resemblance is purely coincidental. Enjoy!
I am using the wonderful work of Ismael Rac, which I purchased it from www.xeracx.net
Items you need:
Scrapkit “Sweet Treats” by AmyMarie, which you can purchase here!
Template by Rosey 86 which can be found here!
You will need a tube & a close-up for this tag
Plugins Needed
Eye Candy 4000
Font is A&S Snapper Script
Image>canvas size> 800x800 (we can crop layer)
Delete the credits layer & white background layer
Also, delete the word art layers & diamond layers
Open Element “berries”
Copy & paste as a new layer
Move this layer below the “Large Grey Rectangle” layer
Place the “berries” element on the left upper side of the background
Duplicate>mirror
Duplicate>flip
Duplicate>mirror
You should have a total of 4 “berries” layers
Merge all of them together
Add the following drop shadow
Vertical – 2
Horizontal – 2
Opacity – 75
Blur – 5.00
Color – Black
Next, select the “Large Grey Circle” layer
Float/defloat
Open paper “pp044” from your kit
Copy & Paste as a new layer
Invert>delete the excess
Deselect
Add your favorite gradient glow
Now select the “Pink Circle” layer
Float/defloat
Open paper “pp2” from the kit
Copy & paste as a new layer
Invert>delete the excess
Deselect & add your favorite gradient glow
Select the “Pink Rectangle” layer
Float/defloat
Open paper “pp5” from your kit
Copy & paste as a new layer
Invert>delete the excess
Deselect
Add your favorite gradient glow
Select the “White circle” layer
Float/defloat
Open paper “pp044” again from your kit
Copy & paste as a new layer
Float/defloat
Invert>delete the excess
Now for a bit of a tricky part
Open element “b3” (or a bead of your choice)
Place inside the left bottom of the “white circle” layer
Duplicate>follow around the circle
Keep duplicating & placing them until you have a full circle
Close off all other layers of your tag besides the “b3” layer
Image>merge visible
Make sure to place this layer right above “pp044” and the “white circle” layer
Next, select the “Purple Circle” layer
Open paper “pp2” from your kit
Copy & paste as a new layer
Invert>delete the excess
Deselect & add your favorite gradient glow again
Now select the “Black Rectangle” layer
Add a new layer
Open element “r4”
Paste as a new layer & place inside of your “purple circle” layer, above your paper layer
Now open your close-up of your tube
Resize if need be (just don’t forget to sharpen)
Place inside the small circle
Invert>delete the excess
Again, open element “r4”
Copy & paste as a new layer
Place inside of your small circle layer, on the opposite side of it
Invert>delete the excess
This will put a ribbon on the bottom & on the top of your close-up
Now adding your tube as a new layer, place your regular sized tube to the left side of your tag
Reselecting your “black rectangle” layer
Float/defloat
Open paper “pp044” again
Copy & paste as a new layer
Invert>delete the excess
Add your favorite gradient glow
Now select your “Pink Squares” layer
Float/defloat
Open paper “pp036”
Copy & paste as a new layer
Invert>delete the excess
Now open element “el1”
Copy & paste as a new layer
Resize to your liking & adjust>sharpen
Position to the left of your “pink rectangle” layer
Duplicate>mirror
Merge both “el1” layers
Add the same drop shadow as mentioned above
Make sure this layer is above the “pink square” layer & your paper layer
Reselect your “pink square” layer
Float/defloat
Now open element “cupcake2”
Copy & paste as a new layer
Move inside the first square on the right
Keep in mind that this layer should be above your balloon layer
Image>duplicate
Image>mirror
Merge the 2 cupcake layers
Now open element “cupcake1”
Copy & paste as a new layer
Resize to your likign
Place inside the second square on the left
Image>duplicate
Image>mirror
Merge with your other cupcake layer
Now open element “aglass3”
Copy & paste as a new layer
Resize to your liking
Adjust>sharpen
Image>duplicate
Image>mirror
Merge both glass layers together
Add the same drop shadow as before
Add your name!
I used #a2e4f0as my forgegound & #a21b56 as my background
Image>free rotate>30%
Place to your liking
Add your favorite gradient glow
For my font, I used A&S Snapper Script at size 72, this is a pay font, so unfortunately, I cannot share :o(
Don’t forget to crop your tag
DON’T FORGET TO ADD PROPER © INFORMATION!!!!!
Anywayz, I hope you have enjoyed this tutorial.
If you have any questions, suggestions, or want to show off your results, please email me at
Labels:
Ismael Rac,
PTU
Subscribe to:
Post Comments (Atom)
About Me

- Designs by Rená
- SAHM to two wonderful children. Married for 14 years to my best friend. I have been using PSP for 15+ years now,and love all aspects of it. If you need to get ahold of me,please email me at designsbyrena01@windstream.net
Labels
- PTU (25)
- Ismael Rac (9)
- VeryMany (9)
- Rebellious Scraps (3)
- FTU (2)
- Anna Marine (1)
- Bettie Page (1)
- Carlos Diez (1)
- Keith Garvey (1)
- Nolan Worthington (1)
- Scott Blair (1)


0 comments:
Post a Comment