


Sunday, May 20, 2012
FTU - I love Boobies!

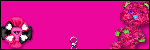
This tutorial was made using PSPX2, but can be adapted
To do this tutorial you must have working knowledge of Paint Shop Pro
This tutorial was written by DesignsbyRená on March 20th 2012
Any resemblance is purely coincidental. Enjoy!
Font is A&S Motherlode
I am using the amazing work of Ismael Rac which can be found here
For the scrapkit, I am using a freebie, called “Misfits_BCA_Pandora” which you can find here!
The template I used can be found here!
You will also need the word art, which can be found here!
Let me just warn you, there are going to be a lot of layers in this tutorial LOL
First, delete the credits & background layers
Then resize to 800x800
You can resize later
Select the Circle 1 layer from the template
Float/defloat
Open Paper 5
Copy and paste as a new layer
Invert>delete the excess
Invert again
Now add a new layer, placing it beneath the layer you just made
Selection>expand by 5
Flood will with a color of your choice.
I used a color from the palette that comes with the tut (#d13882)
Adjust>add noise>Uniform 50%
Add the following drop shadow
V-2
H -2
O – 75
Blur – 5.00
Color black
Now select circle 2
Open paper 6
Follow the same steps above again to get the outline
Now select paper Smaller Rectangle 1
Open paper 18
Copy>paste as a new layer
Invert>delete the excess
Invert again
Now add a new layer, placing it beneath the layer you just made
Selection>expand by 5
Flood will with a color of your choice.
I used a color from the palette that comes with the tut
Adjust>add noise>Uniform 50%
Add same drop shadow
Now select layer Smaller Rectangle 2
Open paper 19
Repeat the steps from above to get the same effect
Now select Rectangle Background layer
Flood fill with a color of choice
Add noise with the same settings
Add the same drop shadow
Now select Rectangle layer
Floodfill with a color of choice (#f765ac)

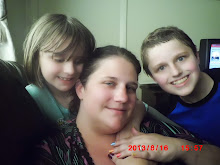
Now would be the time to add your tube as a new layer
After applying your tube, using your selection tool
Delete the bottom of the tube that hangs over the rectangle
Then select the dotted line layer
Using your selection tube
Delete the dots on the top that are overlapping your tube
Now open up your word art, selecting the folder titled Melissa-Melissas Creationz
Then open the file titled MC_MisfitBCAWordart
This is where it gets a bit tricky
Select the layer that says “BOOBIES” and I love boobies!
Now using your selection, select the layer that contains just boobies, and delete it
Copy & paste as a new layer on your tag
Float/defloat
Floodfill with a color from your palette
Then add a new layer, move below “I love boobies” layer
Selections >expand by 3
Floodfill with white, and adjust>add noise>uniform 50%
Add drop shadow
Place to your liking
Now back to your scrapkit
Open the element titled ribbon2
Copy on to the left side of your tag & duplicate>mirror
Add your name using the color of your choice
Keep selected
Add new layer, and place beneath your name
Defloat upon this layer
Then add a new layer below this layer (head spinning yet?) LOL
Selection>expand by 5
Flood will with a color of your choice.
I used a color from the palette that comes with the tut (#d13882)
Adjust>add noise>Uniform 50%
Add the following drop shadow
V- 1
H – 2
O – 75
B - 5
Color – black
Place your name wherever you like it!
Don’t forget to crop your tag J
BE SURE TO ADD THE PROPER © TO YOUR TAG!!!!
Anywayz, I hope you have enjoyed this tutorial!
If you have any questions or want to show my your results,
which will be posted on my blog please email me at
designsbyrena@windstream.net
Subscribe to:
Post Comments (Atom)
About Me
- Designs by Rená
- SAHM to two wonderful children. Married for 14 years to my best friend. I have been using PSP for 15+ years now,and love all aspects of it. If you need to get ahold of me,please email me at designsbyrena01@windstream.net


0 comments:
Post a Comment