


Thursday, May 17, 2012
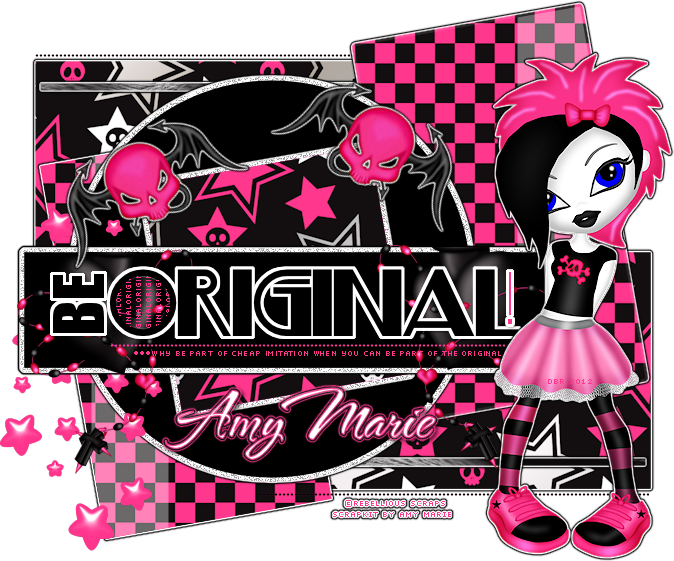
PTU - Emo Girl
ADVANCED TUTORIAL
This tutorial was made using PSPX2, but can be adapted
To do this tutorial you must have working knowledge of Paint Shop Pro
This tutorial was written by DesignsbyRená on March 14th 2012
Any resemblance is purely coincidental. Enjoy!
Font is TheNautiGal
I am using the wonderful work of Rebellious Scraps for the “Emo Girl”, this is a script for PSP, which can now be found here!
For the actual scrapkit, I am using Emoultion__HPNB by AmyMarie, which is just AWESOME!
Which can be found here!
Last but not least you need your template 392, by Missy which can be found here!
For this tut, you will need to have the following plugins
Eye Candy 4000
Now on the tut!
Open your template
Delete the “by missy” layer & the background layer
Go to Canvas size and resize it to 800x800 (don’t worry, we will resize later)
Select layer 3, copy and paste paper1 as a new layer
Select the shape (control a,control f, the control & shift f, should work, it’s float and defloat)
Invert selection and delete the excess
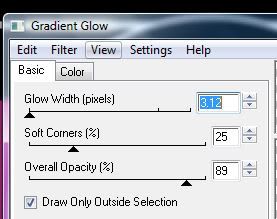
Apply the following gradient glow


Select layer “thin rect”
Select the shape by using the previous settings
Copy & Paste paper 010 as a new layer
Invert>delete the excess
Apply the same gradient glow from above
For square 4 layer, I used the same paper as the first (paper 1)
Copy>paste as a new layer
Invert>delete the excess
Apply gradient from above
Select the layer, then the shape using the float, defloat
On the thin layer level
Select, float, defloat
Using paper 010 as a new layer
Invert>delete the excess
Add the same gradient glow as before
Select the “shape1” layer
Float/defloat
Copy and paste “paper 2”
Invert>delete the access
Add the same gradient glow
Select the “shape2” layer
Select the shape following the instructions above
Copy and paste paper 3 as a new layer
Invert > delete the excess
Add the same gradient glow
Select the “dotted layer”
Select the shape using the above method
then floodfill with black 5 times
You will need to zoom in in order to do this
Do the same to “dotted level 2”
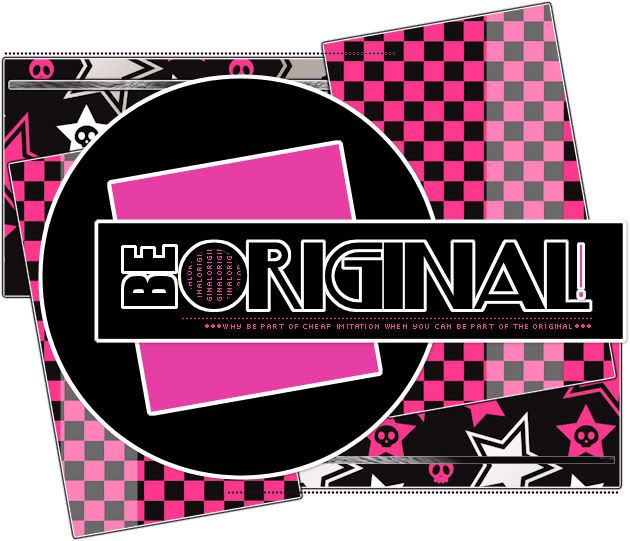
This is what you should have so far:
Go to the circle back layer (white)
Then add 95% noise
Do the same to the square back layer as well
Select the square layer
Select the shape by using the earlier method
Open up paper1
Paste as a new layer
Invert> delete the excess
Now select layer rect back
Add noise again with the same settings
Now here comes the tricky part. In order for the template to match the entire tag, you need to follow these instructions closely
First, using your selection tool on the wordart layer
Click inside each layer, and floodfill with the color: #ff378d
Click on the wordart layer, select only the lower text
“why be a part of cheap imitation….”
As well as the dotted layer.
The you need to zoom in, and using your paint tool, set to 1 pixel, fill each pixel with the new color.
Now making sure that the wordart back is not visible
Pixel by pixel, change the color of the circle words to match which is #ff378d
You can click inside the exclamation point and floodfill it, for an easier approach.
Now merge the wordart & word art back together
Then merge the rectangle & rect back together & rec drop shadow
Moving the rectangle layer (right underneath the wordart) to the left, position,
Then move the word art layer to the middle of the black rectangle
Now comes the easy & fun part!!!
Add Demonskull from the element section
Reduce size by 50%
Sharpen
Free rotate 30% to the left
Place it at the top of the frame (square layer)
Image, duplicate,
Then mirror the demonskull and place it at the opposite side of the frame
Adjust>sharpen
Add the earlier mention gradient glow
Now open stars 3, place on the left
Place this directly beneath the word art and black rectangle layers.
Now open sacred heart
Copy & paste as a new layer on your tag
Move this just below the word art layer
Place it to the left, behind the word art, where the flame is above the black rectangle
Now using your selection tool, delete the top portion, that is over the rectangle
Duplicate, mirror, adjust>sharpen, and place under the word art on the right side
Now is a GREAT time to add your tube of choice!!
If you chose the emo girl by Rebellious Scraps, just follow the script!
If you use this tube, be sure to add the earlier mentioned gradient glow
She doesn’t require © information, but I do, so I put it on there anyway :o)
I chose to use the font TheNautiGal, which is a pay font, so I can’t share :o(
After adding your tube, add your name. I used the following colors #ff378d & white
I also used the following gradient glow
PLEASE BE SURE TO ADD THE PROPER © information
I would also advice that you put a watermark on the tube itself, which if you look close enough, you can see on mine :o)
Anywayz, I hope you have enjoyed making this tag!
PLEASE send me your results to
Designsbyrena@windstream.net
Subscribe to:
Post Comments (Atom)
About Me

- Designs by Rená
- SAHM to two wonderful children. Married for 14 years to my best friend. I have been using PSP for 15+ years now,and love all aspects of it. If you need to get ahold of me,please email me at designsbyrena01@windstream.net


0 comments:
Post a Comment